The O Trek and W Trek in Torres del Paine: The Complete Trail Guide
Are you looking to hike the O Circuit or the W Trek in Patagonia and wondering what the trails are like? This guide gives a complete trail description with stats and pictures for each day along the O Circuit and W Trek in Torres del Paine National Park to help give you a better idea of what you can expect and help you pick which trek you’d like to do!

Patagonia may be a remote corner of the world tucked away in the southernmost regions of South America, but it’s also a world class hiking destination sought after by many outdoor enthusiasts looking to hike among its picturesque granite peaks, iconic mountains, electric blue lakes, massive glaciers, and unique wildlife.
Of all the hiking in Patagonia, the O Circuit and the W Trek are among the most popular trails. Both multiday hiking trails are found in Torres del Paine National Park in southern Chile, a park made famous by its three iconic granite peaks that tower over a beautiful blue alpine lake and give the park its name. The first time I saw pictures of these unique towers, Torres del Paine National Park immediately skyrocketed to the top of my hiking bucket list.
While you can day hike to the Torres del Paine lookout, there is so much more to the park than just these towers, and the O Circuit and W Trek are two popular multiday hikes that take you to most of the highlights of Torres del Paine National Park, including the Torres themselves.
The O Circuit and the W Treks are named after the shape they make on a map.
The O Circuit is typically done as a 7 to 8 day backpacking trip and circles around the entire Cordillera del Paine massif- the main mountain range in Torres del Paine. On this trek, you’ll visit the more remote and quiet backside of the massif, climb the infamous John Gardner Pass for epic views over Grey Glacier, hike into the scenic French Valley, and then finish off the circuit at the base of the Torres del Paine.
The W Trek is an abbreviated version of the O Circuit. It shares the trail with the O Circuit along the western and front sides of the massif, and although it’s shorter (typically 4-5 days), it still hits the highlights: Glacier Grey viewpoints, the French Valley, and the Torres del Paine. Because it’s shorter and little easier, it’s a bit more popular than the O Circuit, and good for those who are short on time.
Along both treks are various accommodation options to break up your days on the trail, with a mix of campgrounds, hostels, and refuges and the option to rent gear and buy meals at each site. So, you can make your multiday adventure as easy (and expensive) or as challenging (and as cheap) as you’d like!
If you’re trying to decide if you want to tackle the trails in Torres del Paine and want to know what to expect, or if you’re simply trying to decide between the O Circuit or the W Trek, then you’re in luck! In this guide, we’ll give a complete day-by-day trail description of both the O Circuit and W Trek. You’ll be able to read about our experience on the trail, and see the hiking stats and pictures for each day of the trek to help you decide which multiday hike you want to do.
How to Hike the O Circuit in Torres del Paine: The Complete Planning Guide
How to Hike the W Trek in Torres del Paine: The Complete Planning Guide
Before we dive in, here are just a few notes about this Torres del Paine trail guide:
We did the full O Circuit as a 7 night / 8 day trek, which is pretty standard and typical, so it’s how we describe the trek in this guide. We also chose to do it as cheaply as possible, carrying all our own gear and food and making it a true backpacking experience. But no matter how you choose to break up your days or experience the trail, this guide will give you a good idea of what to expect along each section of the trail.
If you are interested in the O Circuit, all 8 days of this guide will be relevant to you. If you are just interested in seeing what the W Trek is like, then you can start at Day 4 (but just the second half, after the Paso Campground (jump here). Then you can continue on with days 5 to 8.
In this O Circuit and W Trek trail guide:
Map of the O Trek and W Trek in Torres del Paine
To give you a better idea of what the O Circuit and W Trek look like, take a look at this handy map. As you can see, the O Circuit circles around the entire massif of Torres del Paine, while the W Trek just covers the western and front faces of the massif.

The O Circuit is the combined red and orange track that wraps around the entire massif while the W Trek is solely the orange track that runs across the front side of the massif. Map adapted from the park brochure.
The O Circuit (red) is a one-way loop from the beginning (at the Central Sector) until the Paso Campground. It then meets up with the W Trek (orange) at Grey Campground.
From here, both the O Circuit and W Trek follow the same route around the front face of the massif, to the Torres del Paine viewpoint, and then back down to the Central sector.
This Torres del Paine map also labels the different camping and refuge areas along the trail to help give you a sense of how the days are broken up.
O Circuit and W Trek Hiking Statistics
Here are our stats for the overall O Circuit and W Trek. These numbers are taken from our own personal GPS tracking and may differ slightly from other accounts, but we feel our tracking was pretty accurate.
O Circuit
Distance: 114 km / 71 miles
Total elevation gain: 4,613 meters / 15,135 ft
Days: Typically 8 days
W Trek
Distance: 75.6 km/ 47 miles
Total elevation gain: 3,270 meters /10,726 ft
Days: Usually 4 to 5 days
Elevation profile of the O Circuit and W Trek

This elevation profile shows the full O Circuit, starting and ending at the Central Sector. The W Trek generally runs between Grey campsite and the Central Sector (the second half of this profile).

Our satellite tracking of the complete O Circuit in Torres del Paine
O Circuit Day 1: Torres Central to Seron
Distance: 13.1 km /8.17 miles
Elevation gain: 336 m / 1101 feet
Elevation loss: 306 m / 1004 feet
Time: 4.5 hours
Day 1 O Circuit Map

The green track highlights Day 1 of the O Circuit
Day 1 O Circuit Elevation Profile

The shaded portion highlights the elevation changes on Day 1 of the O Circuit
Day 1 O Circuit Trail Description
We arrived to the Torres del Paine park entrance at about 8:30 am after getting an early bus from Puerto Natales. After checking in at the Laguna Amarga entrance, we hopped on the park shuttle to the Torres region and Welcome Center where the O Circuit begins. Here, we were already getting great views of the front side of the Cordillera del Paine massif!

The view of the Cordillera del Paine massif from the Welcome Center on Day 1 of the O Trek. You can see some of the famous Torres del Paine tucked in the valley in the fog.
We had kind of weird weather for the morning here- even though it was sunny overhead, the rain clouds over the massif along with the typical Patagonia winds caused it to be pretty drizzly on us for the first half of our hike, but the beautiful rainbow over the massif was worth this small weather inconvenience. We were introduced to the crazy and unpredictable Patagonia weather from day 1!
At the Welcome Center, we checked in for the O Circuit and then started the hike! We were on the O Circuit trail on our way to our first campsite at Seron just before 9:30 am, so we had a nice early start.
Day 1 on the O Circuit is relatively easy (certainly the easiest day of the whole trek). There’s some steady elevation gain but it’s not too steep, and there’s not too much of it, and it should only take about a half day’s worth of hiking to get to Seron. It’s a great first day to get your backpacking muscles warmed up for the rest of the trek (which is why we recommend starting your O Circuit here!).
From the Welcome Center, you should see a small gravel path that heads towards the mountains, marked by a small sign with a hiker symbol. This is where you’ll start the O Circuit. This initial area can be a bit confusing because there are paths to all different things- a campground, a refuge, and a hotel- but continue following signs towards the Refugio Torres and Seron. Eventually, you’ll end up on a wider gravel path- and you are now officially on the O Circuit trail and on your way to Seron!

The start of the O Trek behind the Welcome Center in Torres del Paine

Keep following signs towards Seron to keep on track

Enjoying the views right from the start of the O Trek!
The trail starts almost immediately steadily climbing through the rolling hills and meadows beneath the front of the Cordillera del Paine massif, but not too steeply. As you ascend, don’t forget to keep looking behind you for amazing mountain views of the massif.

Ascending the rolling hills along the beginning of the O Trek

Climbing higher above the meadows
With our very first steps on the trail, we were already feeling the strong Patagonia winds blowing through! Sometimes strong gusts would come through and start to sway me off the trail a bit- even with a huge backpack.
Through most of our hike, the strong winds kept blowing some light rain from the mountains across the hills, but it was luckily generally pretty sunny and warm overhead. The rain would come and go- each time we felt like we were just about to be dry, it would come back and piddle on us- just enough to soak everything again.
Wind, rain, and sun all at the same time? Yep- we were definitely in Patagonia.
After some climbing through the open meadows, the path then narrows as it traverses through thicker brush and continues its steady climb. You’ll eventually cross over a fence line and continue hiking through a mix of forest and meadow while following this fence line for a while. It seemed like there were multiple herd paths at times through the more forested parts of the trail, but they all ended up in the same place.


Following the fence line for a bit
After about two hours into the hike, the views begin opening up to the sprawling expanse of the Patagonia landscape on the eastern side of the massif. Views of yellow meadows, rolling hills and a snaking electric blue river will now dominate for most of the rest of today’s hike as you hike above the valley.

Walking along the eastern side of the massif on the O Trek

Valley views on the eastern side of the massif along the O Trek
After a while, the path will begin descending steeply down into the valley and towards the river. The winds got fairly strong for us here (but nothing like we would experience later on in the trek!).
At the bottom of the descent, the trail flattens out as it walks through meadows alongside the river, through a horse pasture, and across several small foot bridges, with some minor (easy) stream crossings.

Descending into the valley to get to the Seron campsite

Walking through the flat meadow in the valley on the eastern side of the O Trek


There are a couple stream crossings on the way to Seron

You’ll also be walking along the blue river you saw from above
Eventually, you’ll make it to Seron (it took us about 4.5 hours to get here). This scenic camp is a flat area tucked in the valley next to some small rolling hills that help protect campsites from the often strong Patagonia winds.

Arriving at the Seron campsite on the O Trek
Seron doesn’t have a refuge, but it has a large meadow for pitching your tent. Most people set up camp at the base of a small hill on one side of the meadow- a good idea for protecting against the wind. But par for the course for us, we wanted some solitude and decided to set up camp on the opposite end of the meadow. We paid the price in wind, though, as it ripped across the grass and made setting up a tent quite an adventure!

Setting up camp at Seron

Enjoying the views from the Seron campsite!
At this point, the sun was shining and we relaxed in our tent, soaking up the warmth and drying off our gear from the drizzly morning before cooking up dinner in the designated cooking area and heading to bed, falling asleep to the sounds of the wind blowing across our tent.
O Circuit Day 2: Seron to Dickson
Distance: 17.7 m / 11 miles
Elevation gain: 425 m / 1395 ft
Elevation loss: 379 m / 1242 ft
Time: 7 hours
Day 2 O Circuit Map

The green highlight shows Day 2 of the O Circuit
Day 2 O Circuit Elevation Profile

The shaded portion shows the elevation changes on Day 2 of the O Circuit
Day 2 O Circuit Trail Description
We woke up on day 2 of the O Circuit to a nice sunny day, so we felt lucky for the good weather and hit the trail by 9:30 am.
We left Seron camp by following a narrow path through the tall grass of the meadow along the river. There were some light ups and downs here, but nothing too substantial.

Day 2 of the O Trek starts off as a relatively easy hike through the meadows

Mountain views along the O Trek
After about a half hour or so of easy hiking, the climbing begins. On this leg of the hike, you’ll be climbing up to a small pass as you circle from the eastern side to the back side of the massif.
The climb starts via a narrow path that climbs a hillside above the river. Eventually, you’ll turn away from the river and continue steadily climbing towards the pass.

Ascending the slopes above the blue river

Enjoying the amazing O Trek views!

The steady climb away from the river
The climb will eventually spill you out at a big pond, where the trail flattens out for a bit as it walks around the side of the water. From here, you can see the pass ahead that you’re aiming for.

Amazing lake views on the O Trek

The climb up to the pass ahead starts just past the lake
From this lake, the trail to the pass gets pretty steep. A narrow path steadily climbs the hillside up a series of long switchbacks through shrubs and grass, but along the entire way, you keep getting ever better views back over the lake behind you and the valley below. This climb isn’t too long, but it is tiring with big packs on, so we definitely stopped once or twice to enjoy the views and catch our breaths.

Climbing up to the pass


The view near the top of the pass
As we approached the top of the pass, the wind started noticeably picking up, and we could start to see larger granite peaks peering over the other side.

Almost at the top of the pass! The mountain views are starting to appear from the other side.
And then, once we reached the top of the pass, two things happened.
First, the views opened up on the other side of the pass to stunning mountains and a beautiful blue lake below (Lake Paine). This beautiful scenery on the backside of the massif is something that is not seen by many of the park’s visitors! But it was hard to appreciate at first because of the second thing that happened once we crested over the pass…

Beautiful views on the other side of the pass!
Up here, we experienced the most insane wind of our lives! It was a sustained strong wind that would knock us sideways (even with our packs on- they acted more like sails than anything!) and it was pretty hard to even just walk forward into the headwind.
And not to be gross (just keeping it real)- it was literally blowing stuff right out of my nose. It was crazy. On that note, we definitely recommend having a buff or something similar to cover up your mouth and nose in spots like this to keep stuff like dirt from flying into your face (and stuff from flying out of your face…) and to just help you breath more easily as you walk into the headwind.
This section of insane wind lasted just a few minutes, but it was definitely an experience to encounter those infamous Patagonia winds that everyone always talks about!
Once out of the wind, the trail began descending off the backside of the pass, and we could now focus on the gorgeous views around us: the stunning blue lake below and the jagged glaciated granite peaks in the distance.

The descent down the other side of the pass

Awesome views on this part of the O Trek!
The path narrows as it makes its way down the hillside above the lake. I was thinking (more like hoping) that the trail would just steadily descend down to the shore of the lake before flattening out, but in true O Circuit fashion, that was not the case.
Instead, the path was filled with short spurts of steep ups and downs as it navigated the rolling hillside above the lake, though it still is an overall downhill hike. The path can get a bit rugged through here, but mostly, it’s a smooth dirt path.

Navigating the rolling hills along the O Trek

Loving these views!

Some sections of trail can get rugged along here
About halfway into the hike (around 1:30 pm), we reached the Coiron ranger station. Lots of hikers were here resting and eating, and we joined them to make some lunch, fill up some water, and use the bathrooms. We rested here for about a half hour before setting off on the second half of the day’s hike.

Arriving at the Coiron Ranger Station on the O Trek- a great rest stop!
From the Coiron station, the hike actually remains relatively flat for most of the way as the narrow path weaves through the meadows, with some small gradual inclines here and there- but the hardest parts of the day are definitely behind you now.
Even better, through this portion of the hike you are surrounded by gorgeous mountain views all around, and particularly of the back side of the Cordillera del Paine massif. Dark clouds were ducking in and out of the mountains, but luckily, we stayed dry and warm on our hike, until the very end…

The second half of day 2 on the O trek is relatively easy, but with amazing mountain views


A glimpse at the back side of the Cordillera del Paine massif on the O Trek

On the last part of our hike, it did start drizzling on us right as we had to climb up and over one final hill before camp. At the top of the hill is a view down to Dickson camp and refuge where it sits at the edge of the scenic Dickson Lake. On a clear day, the camp is surrounded by beautiful mountains with views of the Dickson Glacier, but we weren’t so lucky today as the rain had solidly moved in.

A look down at Dickson camp before the final descent. On a clear day, there would be gorgeous mountain views here.
We were starting to get rather soaked, so we pushed on to camp as quickly as we could, which actually wasn’t so quickly because the final descent into camp was rather steep. It was also now extra slick and slippery from the rain, and navigating it with heavy packs made it a bit slow-going. But once at the bottom of this descent, it was a fast flat walk into camp. We got to Dickson by about 5 pm.
At Dickson, we signed in, walked past the refuge, past the field of pre-setup tents, and towards the woods where there were spaces to set up our own tent. Some spaces were in the woods and more sheltered from the elements, but we got there too late for any of those. It was a gloomy and rainy evening at camp, but the sound of rain on our tent definitely lulled us to sleep that night.

Camping at Dickson campground on the O Trek
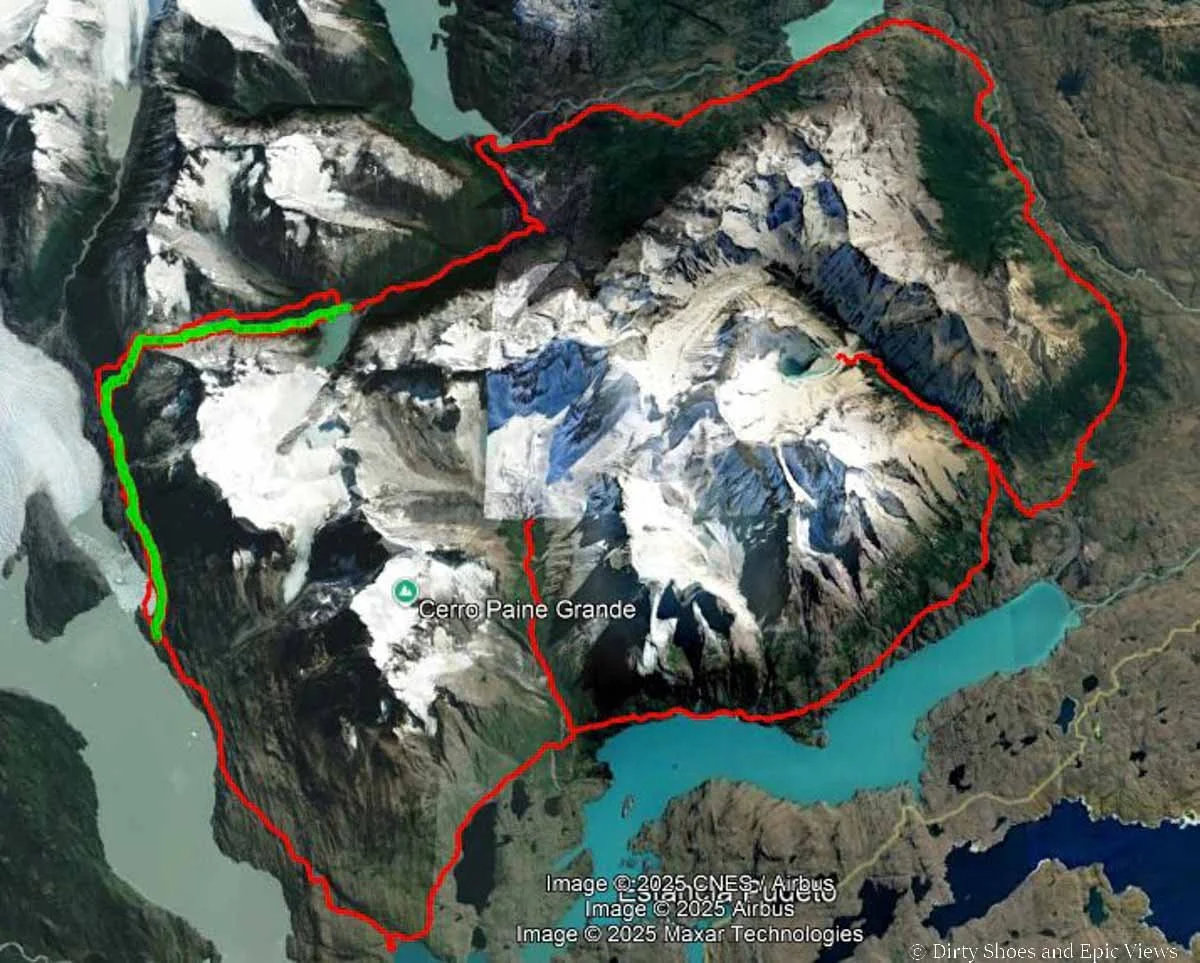
O Circuit Day 3: Dickson to Los Perros
Distance: 11.1 km / 6.91 miles
Elevation gain: 468 m / 1537 ft
Elevation loss: 115 m / 377 ft
Time: 5 hours
Day 3 O Circuit Map

The green highlight shows Day 3 on the O Circuit
Day 3 O Circuit Elevation Profile

The shaded portion shows the elevation profile for Day 3 of the O Circuit
Day 3 O Circuit Trail Description
We woke up on Day 3 of the O Circuit to a sunnier morning. And to our pleasant surprise, we realized that the rain all night down at camp was actually snow up in the higher elevations, and the mountains surrounding us were covered in a beautiful layer of white.

Our morning view from Dickson campground
The mountains were much more visible today, though there were still some gloomy clouds hovering above them that were foreshadowing the weather ahead.
Nevertheless, we started off optimistically on the trail by about 9:30 am or so. Today is a shorter day on the trail in terms of distance, but on this part of the O Circuit, you’ll start the ascent up towards the infamous John Gardner Pass, so today is mostly a climbing day and it can be a bit tiring and tough.
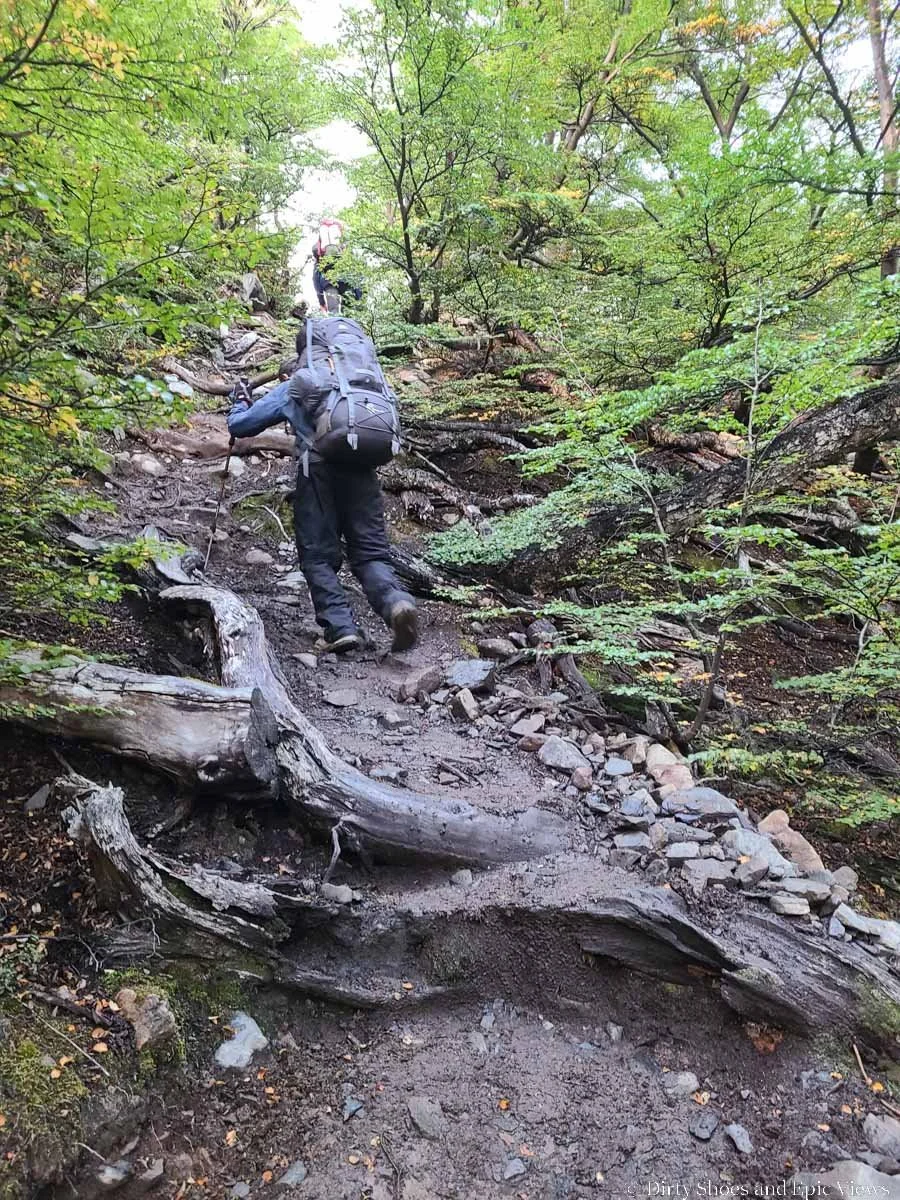
Almost immediately from camp, the trail enters the forest and starts a steep and steady climb. It was also quite slick and muddy through here from yesterday’s rain.

Day 3 of the O Trek starts off with a steep and muddy forest climb
Not too far into this climb, a small clearing allows you to glance back and see views of Dickson Lake and the gorgeous distant mountains, and it makes a good scenic spot to catch your breath a bit!

Stunning views over Lake Dickson!
From here, the trail continues its steep climb through the forest, with some small glimpses of the nearby jagged peaks from time to time. For the most part, though, this part of the trail is just a grind.

Glimpses of the surrounding mountains from the forest trail

This part of the O Trek is mostly a steep climb through the forest
After a bit more climbing and about 3 km (1.8 miles) of hiking, we topped off onto a clearing to a viewpoint called the Mirador Valle de los Perros.
We joined a group of hikers already here and enjoyed the great panoramic mountain views. From here, you can see all the way back down to Dickson Lake, and the Dickson Glacier is still peeking out from around the corner.

An amazing view of Dickson Lake and Glacier from the Perros Valley Viewpoint on the O Trek

Stunning mountain views from the Perros Valley Viewpoint
From this viewpoint, the trail flattens out for a bit, which is a nice break from the climbing. The forest is also quite sparse up here, so you have a nice stretch of beautiful views towards the mountains ahead as you now make your way towards the Los Perros Glacier.

Beautiful trail views from the O Trek

Take time to enjoy the mountain views on this easy section of trail!
The trail eventually ducks back into the forest and continues its climb. Through here, we crossed a few rickety bridges across some small streams (some bridges were in better shape than others).

Continuing the climb through the forest

We eventually came across a sort of disheartening sign that helped visualize where we were and how much of the hike we had left. Only 3 km left to go, but still quite a bit more climbing… So, on we went.

These signs are found every so often along the O Trek to help you keep track of how far you’ve gone and how much you have left each day
As you continue climbing, you start to get some viewpoints through the woods of the Los Perros Glacier, and across the river are waterfalls tumbling down the forested hill, with some jagged peaks towering behind- the scenery really starts to get good up here!

Beautiful views from the O Trek

The first glimpses of the Los Perros Glacier!
After crossing a particularly precarious footbridge, the trees get shorter, the forest gets more sparse, the views open up, and the trail gets rockier as you transition onto a glacial moraine beneath the Los Perros Glacier.

A stream crossing along the O Trek

Starting the ascent up the moraine towards Los Perros Glacier


The climbing through here is steady, and at this point, the trail just seemed to go on forever for some reason. It was getting progressively colder and windier, and we had found the rain at this point, which certainly didn’t help our spirits.
Eventually, you’ll find yourself entirely on the rocky and exposed glacier moraine. Ahead, Los Perros Glacier is in site, and underfoot you have to navigate small boulders up the steep moraine. Up here, you’re in an exposed alpine environment, and rain turned to snow as we made our way closer and closer to the glacier viewpoint.

Nearing the top of the glacial moraine next to Los Perros Glacier
After a final steep and tiring push to the top of the moraine (we got there just after 2 pm), we were rewarded with beautiful views over the Los Perros Glacier and its small electric blue lake below. We couldn’t really take the time to enjoy them, though- I was cold and wet and ready to get to camp!

Trying to enjoy the view of the Los Perros Glacier!
The trail continues across the rocky moraine on a visible herd path, but you can also now start following wooden posts with orange blazes on them to keep on the trail. The path descends down the other side of the moraine with the option to make just a small detour on a path that brings you right to the shore of the blue lake for gorgeous views up to the glacier. Even though I was tired and freezing, we couldn’t skip this!

Navigating the rocky moraine near the Los Perros Glacier

Standing at the shore of Los Perros Lake
From the lake, it’s thankfully a short and flat walk across a rocky stream bed to Los Perros Campground, and we arrived by about 2:50 pm.

Heading to Los Perros campground
The campground is tucked into the woods and campsites are pretty sheltered from the elements, which is nice. Throughout the night, we heard the wind howling around us but it never blasted our tent.

Los Perros Campground
We spent a very cold night here, and tried to get a good night’s sleep for the most challenging day of the O Circuit tomorrow.
O Circuit Day 4: Los Perros to Grey
Distance: 14.2 km / 8.8 miles
Elevation gain: 847 m / 2779 ft
Elevation loss: 1312 m / 4306 ft
Time: 11 hours
Day 4 O Circuit Map
The green highlight shows Day 4 of the O Circuit
Day 4 O Circuit Elevation Profile

The shaded portion shows the elevation changes for Day 4 on the O Circuit
Day 4 O Circuit Trail Description
This day of the O Circuit is the hardest and longest. You’ll climb up and over the famous John Garder Pass, the highest point on the O Circuit with big views of the Grey Glacier (one of the major draws for hiking the entire O Circuit!).
And while climbing up the pass is a challenge in itself, climbing down the other side – all 4,000 feet of it- is arguably harder, with tired legs, a heavy pack, and several days of climbing wearing on your legs and feet.
We left Los Perros camp at 7 am sharp- and so will you, because rangers will literally go around and kick you out by 7- that’s how long this day will be!
You’ll be starting today in the dark, so make sure you have your headlamps ready to go. Because we were in the dark for the better part of an hour here, we can’t tell you too much about this part of the trail other than it was very steep, muddy, and rugged.
The climbing starts immediately from camp, and it stays pretty relentless and steep all the way up to the tree line. On top of the steepness, it was also the most rugged part of the O Circuit yet- you’ll have to use your headlamp to navigate lots of rocks and roots and through particularly muddy and slick parts.
Starting the ascent up to John Gardner Pass

This part of the hike can get quite muddy!
After about a half hour, we emerged into a clearing in the woods just as it was starting to get light out and we started to get a taste of the snow-covered mountain views around us before ducking back onto the continuously steep path through the forest.
We emerged above the trees by around 8:15 am (after over an hour of steady climbing) just as the sun was starting to rise above the horizon behind us. The mountain views were absolutely gorgeous, but the views were also a bit intimidating, seeing the valley we had to climb through ahead.

Emerging from the trees and looking down the valley towards John Gardner Pass

As you head up John Gardner Pass, you’ll be surrounded by incredible mountain views

You also might catch a beautiful sunrise!
From the tree line, the trail now disappears into rocky alpine terrain. The path eases up a bit as you head deeper into the valley, and you’ll use wooden poles with orange blazes to navigate your way towards the pass, so keep your eyes out for those. And unless you’re ahead of the pack and a fast hiker, you’ll also see all your fellow O Trekkers ahead of you looking like little ants forging the path ahead.
Despite how tired you may be, though, take your time to enjoy the views around you. The climb to John Gardner Pass is a gorgeous part of the O Circuit, and here you’ll be surrounded on all sides by beautiful jagged snowy mountains, and the views only get better as you hike higher and higher up the pass.

Navigating the rocky slopes on the way to John Gardner Pass

Gorgeous mountain views on the way to John Gardner Pass


Once you’re deep into the valley, the path turns steep again (after about two hours into the hike at this point), and from here, it’s a continuous and relentless rocky climb to the top of John Gardner Pass.
There was also quite a bit of snow and slush scattered across the terrain up here along with a few small stream crossings, often making the path quite slippery, and we really had to concentrate on our footing and stability. I normally don’t hike with trekking poles, but I borrowed one of Kevin’s through this part of the hike just for extra stability. Again, keep your eyes out for the wooden posts and find the path of least resistance to each of them.
It really is just a grind to the top here, and we’d stop every now and again to take microbreaks and enjoy the incredible mountain and glacier views around us.

Heading up the rocky and steep slopes beneath John Gardner Pass

Make sure to keep your eyes out for the orange poles and blazes to stay on track

We started to see a lot of slick snow as we got higher up the pass

The views on the way up to John Gardner Pass were stunning!

We passed by a small frozen waterfall on the way up to the pass. If you look closely, you can see other hikers ahead navigating their way through the rocky terrain.


It’s a steep climb up to John Gardner Pass but the views are epic!

Stopping to admire the views

There are some pretty steep and slick pushes on the way up to John Gardner Pass. Having trekking poles is super helpful here.
We started to top over the pass at about 10:30 am (so about 3.5 hours into our hike). As soon as we did, those strong Patagonia winds kicked in. They weren’t as bad as the Day 2 winds we experienced, but they were still enough to blow Kevin’s pack cover right off his pack (and a stressful chase across rocky slick terrain ensued…).
But as we crested over to the other side of John Gardner Pass, I think both our jaws literally dropped.
The full expanse of Glacier Grey came into view. It was the biggest glacier we had ever seen, and it was surrounded by gorgeous jagged peaks with tumbling glaciers- the whole scene was stunning. Certainly worth the climb to get here, and in our opinion, definitely worth doing the entire O Circuit for!

Our first glimpse of the Grey Glacier as we crested over John Gardner Pass
The trail immediately starts descending down the other side of the pass. It might be hard to do with the views in front of you, but keep your eye on the ground and tread carefully, as it’s quite rocky and slick through here.

Descending the other side of John Gardner Pass- and the views of Grey Glacier get better and better!
Believe it or not, as you hike to the lower part of the pass, the view of Glacier Grey actually gets even better! The lower you get off the pass, the closer you get to the glacier, and from this perspective, the glacier begins to look even bigger and more epic. And don’t worry, you’ll keep getting views of this glacier for the next day and a half along the O Circuit!

I mean- just wow!

Make sure to follow the orange poles to guide you back down the pass
Enjoy these stunning views as you continue to follow the wooden poles steeply down the side of the pass. The path here is rocky, steep, and slick, so we took our time through here.
The path eventually turns towards the foot of the glacier so that you’ll now be wrapping around to the west side of the massif, and eventually a narrow herd path will become visible through the rocky terrain as it guides you down to the tree line below.

A more defined herd path heads to the tree line below
It doesn’t take long to reach the tree line, and trust us- things don’t get easier from here. In fact (and we’re sorry to tell you this), you arguably still have the hardest part of the day ahead of you: the descent.
The descent off John Gardner Pass is actually probably the hardest part of the entire O Circuit (at least it was for me!). It’s a very steep, very rugged trail through the forest as it drops over 2,200 feet (670 m) in just the first 1.3 miles (2 km) off the pass, and with a heavy pack on and with tired legs from the climb up the pass that morning, this was a very exhausting and very challenging descent, and quite tough on the knees.
At first, the trail has lots of steep steps, and even some sections where there is rope running alongside the path to help on steeper portions. But along most of the way, there are a lot of roots and rocks to navigate. Again, I had to borrow one of Kevin’s trekking poles to help- I’d say they are pretty necessary through here.

Navigating the rugged descent off John Gardner Pass


Your first goal for the descent off the pass is the Paso Campground (an old campground not currently in use, but a good resting point!). And at first, I was feeling pretty good. Throughout the descent, the constant glimpses through the trees out to the massive glacier running just alongside the path helped keep spirits up, and I was feeling pretty good given that I was mentally prepared for the challenging descent today- that is, until we came to this very discouraging sign…

We were only halfway down the descent to the Paso Campground!
I got to a point where I felt we had done so much descending that we just had to be close to the Paso campground near the bottom of the pass, and then this sign comes around telling us we were only halfway there!
From that sign, the hike got tough mentally, however the trail itself did start to ease up- it was getting less steep and had less obstacles (rocks, roots, etc) which definitely helped.
You know you’re getting close to the Paso campground (about ten minutes away) when you cross over a rocky stream bed downstream of a waterfall with beautiful open views out to Glacier Grey. It looks so incredibly close now since you’re so much lower in elevation here!

An epic view of Grey Glacier just before Paso Campground

The view of Glacier Grey is so much closer now that you’ve descended so far off the pass!
You’ll climb back up the other side of the stream and to a few more good viewpoints of the glacier before hitting Paso Campground for a much-needed rest.
Nearly two hours after hitting tree line off the John Gardner Pass, we had made it.
Paso campground (the boundary for the W Trek)
Paso Campground used to be a free campsite run by CONAF, however it has been closed for a while now (and we’re not sure if or when it will ever reopen), so for now, it’s used as a good checkpoint along the trail and good place to rest after a very long morning of tackling the John Gardner Pass. It has bathrooms, water fill ups, and a place to cook.

Paso Campground and Ranger Station
There’s also a very handy map here to show you how much you have left to go for the day to get toe Grey (which can be motivating or discouraging depending on how you’re feeling!). Basically, the map estimates another four hours to get to Grey Campground and Refuge. Yikes…

A nice visual to see how much you have left until the Grey Campsite
We rested at Paso Campground for almost an hour before setting off on the second half of the hike. While the hardest part of the day is definitely behind you, the path ahead is still full of small ups and downs that really add up on tired legs. There are some rugged sections of ascent and descent here and there, but for the most part, it’s a pretty smooth path.
But this was also one of our favorite parts of the entire O Circuit. Along this section of the trail, you’ll be walking mostly on a narrow path that runs along the exposed hillside above the lake and glacier, so you’ll have incredible views of Glacier Grey for most of the rest of the day. You’re so close that you can clearly see all the crevasses and features of the glacier below, and the views back towards the mountains and icefield are just breathtaking.

Epic views of Grey Glacier continue all along this part of the O Trek

Walking on the slopes above Grey Glacier and Grey Lake

Epic glacier views

Reaching the end of the glacier tongue and looking out over Lake Grey
This part of the O Circuit is also known for its three scenic suspension bridges with gorgeous views over Glacier Grey and Lake Grey. You’ll likely start seeing some W Trekkers now on the trail, as it’s common for those doing the W Trek to stay at Grey Campground and day hike up to at least the first, if not all, of these bridges.
After about an hour of hiking from Paso Campground, we came to the first of the three suspension bridges. Admittedly, these were a bit nervewracking for me (Kevin was completely fine!). You have to climb a small ladder to get up to the bridge, and then walk across the wobbly wooden planks. The bridges are actually pretty long and quite high up, so this could be a challenge for someone with a fear of heights. I took it slowly (perhaps comically so), just looking at my feet and putting one foot in front of the other, and when I got to the other side, I took time to enjoy the views from safe ground.

Climbing up to the first suspension bridge along the O Circuit

Crossing the suspension bridge with Grey Glacier in view
After this first bridge, the trail has some steep bursts of climbing, and climbs for quite a bit. There’s also one point where you have to downclimb a short wooden ladder, but you’re still graced with amazing views back towards the glacier and over Lake Grey.

There are some steep bursts of climbing along the trail


Glacier Grey is still in view behind you!


One of my favorite pictures overlooking the Grey Glacier!
About an hour after the first bridge, you’ll come to the junction for Mirador (Lookout) Grey- a common turnaround point for the W Trekkers coming from Grey Campground.
We dropped our packs at the intersection and made the .2 mile detour through the woods to the lookout, which took less than ten minutes. Though we at first questioned if we should do it (we were pretty tired at this point!), I’m glad we did because it was a great view straight out at Glacier Grey.

Be on the lookout for this junction for the Grey Glacier Viewpoint

The view from the Grey Glacier Viewpoint- this is a great turnaround point for W Trekkers that gives you a great look over the entire glacier
Just after this lookout was the second suspension bridge.

Crossing the second suspension bridge
And then about 40 minutes after that, we came to the third and final suspension bridge. This one has a long ladder to climb down at the end which is a little tricky with a big pack on.

Crossing the final suspension bridge along the O Circuit
Here, you’re much further from the glacier now and you can really only just see the toe of it.
After the final bridge, the path continues with views over Lake Grey. It’s mostly downhill now, thankfully, and you’ll start approaching a small lagoon that often has small icebergs floating in it. The shoreline of this lagoon is near Grey Campground and is another viewpoint of the glacier that you can hike to, and it’s also the starting point for boat and glacier trekking tours that you can take out of Grey Campground.

Hiking above the glacial lagoon near Grey campsite
You’ll get to the junction for this short detour just before reaching camp. We were so tired at this point that we opted out of it, but looking back, I kind of wish he had just done it! You’ll get a great head on view of the foot of Glacier Grey from down there.
We hobbled into Grey Campground just after 6:30 pm- so it was about an 11.5 hour day for us- not our longest day ever of hiking, but certainly our longest day of backpacking! The last part of the trail to camp was through the woods, and it just seemed to drag on forever, so we were very happy to see camp, check in, set up camp, and just relax for a bit.

Grey campsite
O Circuit Day 5: Grey to Paine Grande
Distance: 10.2 km / 6.34 miles
Elevation gain: 341 m / 1120 ft
Elevation loss: 383 m / 1256 ft
Time: 4.5 hours
Day 5 O Circuit Map

The green highlight shows Day 5 on the O Circuit and the start of the W Trek
Day 5 O Circuit Elevation Profile

The shaded portion shows the elevation profile for Day 5 of the O Circuit (and the start of the W Trek)
Day 5 O Circuit Trail Description
Thankfully, the fifth day on the O Circuit is fairly easy and short, which is nice given the previous day! The only thing that really makes this day hard is the fact that it’s your fifth day on the trail, and your legs will probably be quite tired from tackling John Gardner Pass yesterday.
The trail from here on out might seem a bit busier as well. Because Grey Campground is one official end of the W Trek, this is the first point along the O Circuit where you will share a campground with W Trekkers, and from here, the trails will seem a bit busier now that both circuits have intermingled.
Because today was a short day, we took our time getting ready in the morning and didn’t start on the trail until 11 am.
The first half of today’s hike is an overall uphill climb, sometimes with short, steep, and rugged bursts. Our pace on the uphills was a bit slower today after yesterday’s climbing, so it’s a good thing this day was short!
You’ll be walking along the hillside above the lake through a mix of meadows, shrubs, and rocky terrain with great open views over Lake Grey on your right, distant views of the glacier behind you, and jagged peaks of the western side of the massif to your left, with an occasional waterfall cascading down the rocky cliff faces.

Glimpses of the west side of the Cordillera del Paine massif

The trail can get a bit rugged through here as it climbs above Grey Lake

Climbing above Grey Lake

Rugged climbing along the trail

As you climb higher, views open up back towards Glacier Grey, now much further away
After about two hours of hiking, we nearly topped out at the highpoint for the day, which is about the midway point of today’s hike. Up here, there is a nice rocky outcropping with great views out to the now distant Glacier Grey, a viewpoint known as Mirador Lago Grey. It’s pretty much the first views of the glacier that W Trekkers get on their way from Paine Grande, and one of the last views you’ll get of the glacier as you hike on the O Circuit towards Paine Grande. There will likely be a lot of people out there enjoying the views, so we hiked just a tad bit past it and found a nice spot off trail to rest, eat lunch, and enjoy the views in solitude.

Mirador Lago Grey- the rocky overlook found near the top of the climb. This is also another great turnaround point for W Trekkers hiking from Paine Grande.

Continuing up the trail past the lookout (this is looking back down the path towards the glacier)
We rested here for about a half hour before finishing the last bit of climbing up to one final overlook of Lake Grey before the descent down to Paine Grande began.
The second half of the day’s hike is an overall gradual downhill trail to camp and to the shore of Lake Pehoe. The scenery is beautiful through here, and doesn’t change too much for the rest of the hike.


You’ll pass by a small reflective tarn, and then hike down between the rolling hills at the base of the massif towards Lake Pehoe, which eventually comes into view.


The last bit of downhill hiking before reaching Paine Grande
Before you know it, you’ll be able to spot the large lodge at Paine Grande and you know you’re close. We reached camp by about 3:30 pm, so it was only about 4.5 hour day of hiking.
As you approach the Paine Grande lodge and campground, be sure to turn around and look behind you, because the famous “Horns”, or Cuernos mountain range of Torres del Paine is now in view! We thought that Paine Grande definitely had the best views of any other campsite on the O Circuit, so check in, get set up, and enjoy your dinner with a view.

Finally reaching the Paine Grande site that sits along Lake Pehoe

The view of the Horns from the Paine Grande campsite!
O Circuit Day 6: Paine Grande to Frances (via the French Valley)
Distance: 19.3 km / 12 miles
Elevation gain: 851 m / 2791 ft
Elevation loss: 731 m / 2397 ft
Time: 9 hours
Day 6 O Circuit Map

The green highlight shows Day 6 of the O Circuit
Day 6 O Circuit Elevation Profile

The shaded portion shows the elevation profile of Day 6 on the O Circuit
Day 6 O Circuit Trail Description
Today is a long day in distance (one of the only double digit mileage days on the O Circuit!), but it’s definitely not the hardest. Most of it (and all the hardest parts of it) will be hiked without your big backpacking pack.
We started the hike today just after 9 am, setting out for the Italiano Campground that sits just at the base of the French Valley. This part of the hike is one of the easiest along the O Circuit- it meanders through the rolling hills beneath the front side of the massif. It has its ups and downs, but none of the climbing was steep for once. And the whole time, you will be walking towards the Horns, so it’s a very scenic section.

Climbing above Paine Grande which you can see sitting on the edge of Lake Pehoe

Hiking towards the Horns and the French Valley

The landscape varies as you walk by small lakes, through forests of ghostly white trees, across short suspension bridges over streams, and get ever closer to the famous Horns.


As you get closer to the Italiano campsite, you can start to see into the French Valley, and eventually you will make a short descent to the campsite at the start of the valley. We got here after about 2.5 hours of hiking. This short section between Paine Grande and Italiano is about 4.5 miles (7.2 km).

Peering into the French Valley
The Italiano campground is another site that used to be free and run by CONAF, however, like Paso, it has been closed for some time. However, this is a good resting point for before and after the hike into the French Valley, but most importantly, it’s a spot to drop your heavy packs!

Hiking into the Italiano campsite at the start of the French Valley

Italiano is a good spot to drop your heavy pack before hiking into the French Valley!
It felt so good to be able to hike without the weight on our backs for the first time in 6 days- I felt almost feather light, and even though we had almost 2,000 feet of climbing to get to the top lookout in the French Valley, I felt good!
We set out from Italiano at about noon. Note that there is trail closure sign posted here- you cannot start up into to the valley after 1:00 pm, so just plan your day accordingly!
The hike into the French Valley goes to two viewpoints: the Frances Glacier Lookout and the Britannico Lookout. From Italiano, it’s about a 3.5 mile / 5.6 km one-way hike to the final viewpoint, with just under 2,000 ft / 610 m of elevation gain.
As you leave Italiano, the trail starts off pretty easy and flat as it meanders through the camp, but then it quickly starts its steep climb through the forest. The trail is steep and rugged, full of rock and root obstacles. But after about ten minutes, you’ll get your first great open views out towards the French Glacier ahead.

The quick forest climb at the start of the French Valley

The trail quickly transitions onto rocky terrain beneath the French Glacier
The trail transitions between forest and rocky terrain at this point- you can follow the wooden poles with orange blazes to guide you through the less obvious sections of trail.
As the trail continues to steeply climb, don’t forget to look behind you as views of the lakes and valleys below (where you were hiking just this morning!) open up.

Epic views of the French Glacier

Traversing the rocky glacial moraine alongside the French Glacier
One really cool thing about hiking through here was that the French Glacier was actually quite talkative. It cracked a lot, and we could hear the thundering permeate throughout the valley- super cool!
The trail will eventually duck back into the woods and it’s a steep and slick path up. You can now follow the red blazes marked on rocks to stay on trail.

The rugged forest trail as it climbs deeper into the valley
When you emerge again from the trees, the views are stunning, with the French Glacier on your left, and now the Horns on your right and closer than ever. Mountains views are all around as you continue to hike deeper into the valley.

Views of the Horns and other jagged peaks now open up as you emerge from the forest

Looking back down the valley where you hiked from!
After one hour of steep climbing from the Italiano campground, we reached the official mirador, or lookout, of the French Glacier, marked by a sign. And it was a view that was definitely worth the climb.

The view of the French Glacier from the Mirador Frances Lookout
During our quick respite here, the glacier cracked a few times and we watched the snow and ice tumble down the mountain like a waterfall. From here, there were also panoramic views over all the surrounding mountains and the valley, which seemed really far down from up here!
We didn’t linger too long here and instead continued up to the Britannico Lookout.
From the first viewpoint, the trail starts off by ducking in and out of the shrubs along a scenic river, and it gets a little less intense and steep. Instead of one steady climb, it was filled with more ups and downs, with short bursts of steep climbs here and there that sometimes required a bit of scrambling to maneuver through. The trail does stay pretty rugged and rocky the whole way.

Continuing past the mirador deeper into the valley

Awesome views of the Horns in the French Valley

French Valley views
After about an hour of hiking from the first viewpoint, we came to a flat open area with great mountain views. At this point, were still about 25 minutes away from the mirador and the trail was starting to feel a bit long.

Stunning mountain views in the French Valley

We walked through the open meadow for about 15 minutes or so before the trail ducked back into the woods for one final and steep rocky climb up to the Mirador Britanico (the final climb took less than ten minutes through a small boulder pile).

The final climb up to the Mirdor Britanico

We got to the lookout, marked by a sign, at about 2:30 (so after 3.5 hours of hiking from Italiano). Again, the climb was worth it, as the views up here were stunning. We spent about 40 minutes up here by relaxing, eating some snacks, and just enjoying the view.

The Mirador Britanico viewpoint
It took us about 2.5 hours to retrace our steps all the way back to the Italiano campground. As we were hiking down, the views ahead were stunning over the valley below, but I was starting to feel pretty tired. I could feel the past 6 days of hiking finally catching up to me!

Heading down from the lookout and looking at the view all the way back down the French Valley
We rested at Italiano for about 15 minutes, but we just wanted to be done with our hiking for the day. The sign at Italiano said that Frances was about 2 km, or 30 minutes, away- not bad! But the hike out of Italiano started off with a big climb out of camp, which was a bit disheartening. However, the path was actually pretty smooth sailing as it ran between the base of the Horns on the left and a scenic lake on the right. Frances Campground did indeed come up super fast- we made it there in about 20 minutes, right after 6 pm.

Views on the way to the Frances campsite


Arriving at Frances campground
Frances wasn’t our favorite campground on the trek by any means- it was small and cramped and on a hill, and it was pretty loud at night. However, we could still hear the French Glacier cracking all the way down here!

Tents at Frances campground
O Circuit Day 7: Frances to Chileno
Distance: 15.1 km / 9.38 miles
Elevation gain: 702 m / 2303 ft
Elevation loss: 454 m / 1490 ft
Time: 7 hours
Day 7 O Circuit Map
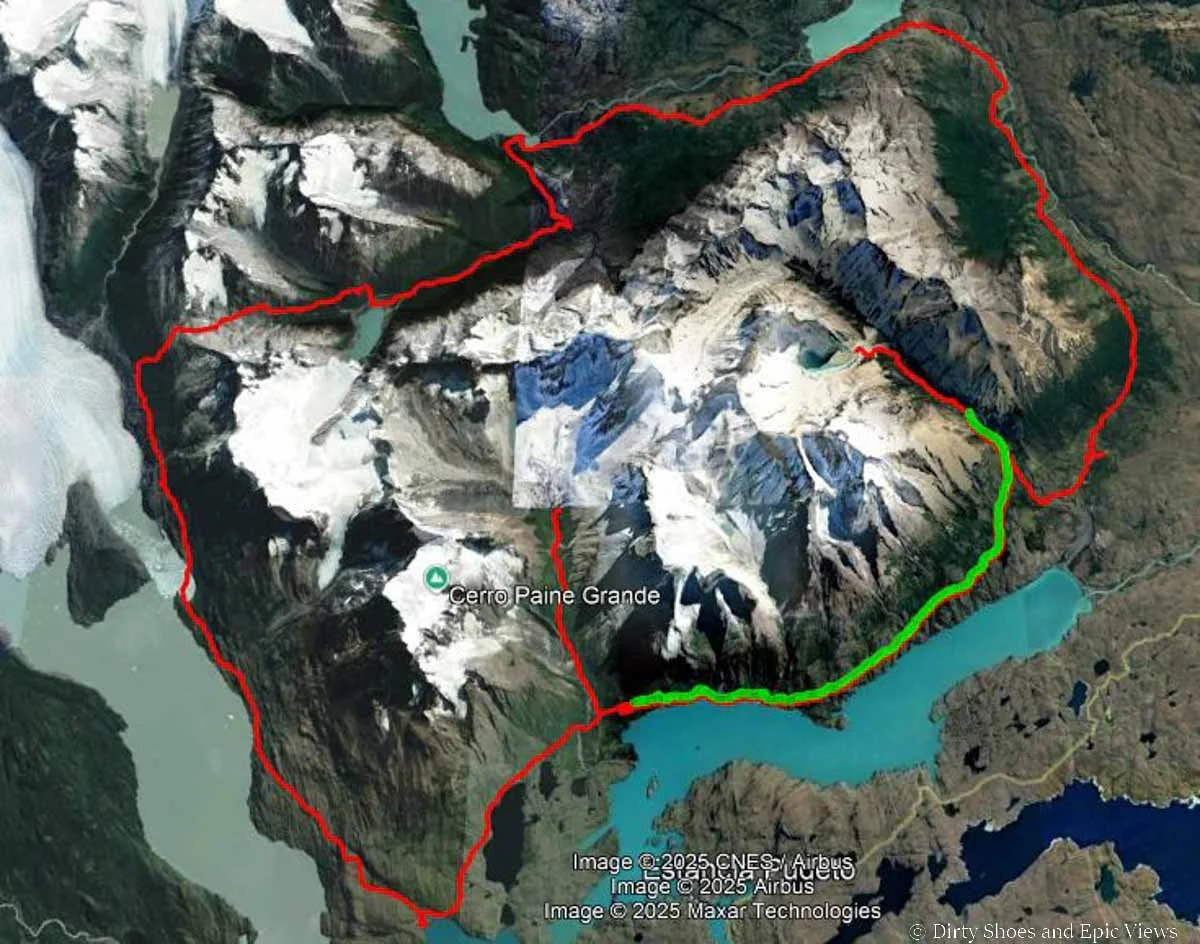
The green highlight shows Day 7 of the O Circuit
Day 7 O Circuit Elevation Profile

The shaded portion shows the elevation profile of Day 7 of the O Circuit
Day 7 O Circuit Trail Description
We got another late start today- we hit the trail at about 10:30 am. We weren’t too concerned because it wasn’t a terribly hard hike ahead of us, but it still turned out to be a pretty long day.
On this part of the O Circuit, you’ll be hiking across the rolling hills between the cliffs along the front of the massif on your left and Lake Nordenskjold on your right- a massive and scenic blue lake that spans most of the front of the range.

Looking out over Lake Nordenskjold

Today’s hike had lots of ups and downs, some of which can get steep. It wouldn’t be too hard of a hike on its own and on fresh legs, but we were just feeling a bit tired at this point, so we took it easy and rested several times along the way.
At one point, the trail climbs steeply down to the shore of the lake and you get beautiful views over the clear blue water.

Walking along the lake shore

This section of the O Trek has lots of ups and downs!

Admiring the front face of the Cordillera del Paine massif
We made it to the next campsite/refuge along the trek, Cuernos, after about an hour and half or so (and 3 km) of hiking. This is an alternate place to stay if you couldn’t get a spot at Frances, and the views here looked amazing.

Scenic cabins at the Cuernos site. There’s also a campground nearby as well.
From here, the trail continued as normal, climbing up and down across the hillside. This part of the hike felt pretty long- the views are pretty throughout here, but they don’t change much, and with the constant hills, it felt sort of monotonous.

There were lots of steep and rocky climbs on this part of the O Trek

There were also a lot of beautiful lake views

And lots of beautiful mountain views

A scenic suspension bridge- much less scary than the ones from three days ago!

Beautiful blue lake views on the O Trek!
We finally reached the first of two junctions just before 3 pm. At this first junction, you can either head back down to the Torres Central campsite and hostel (basically where you started the O Circuit 7 days ago!), or you can head towards the Chileno campsite, which sits in the valley at the base of the Torres del Paine.

A key trail junction along the O Trek
While it’s certainly most ideal to stay at Chileno, often people have to book their last night on the O Trek at the Torres Central campsite since spots at Chileno fill up fast. It’s not ideal, as it’s a much longer climb to the base of the Torres the next morning, but you gotta do what you gotta do.
Fortunately, we were able to snag a campsite at Chileno, so we continued our hike towards Ascencio Valley where the Torres hid.
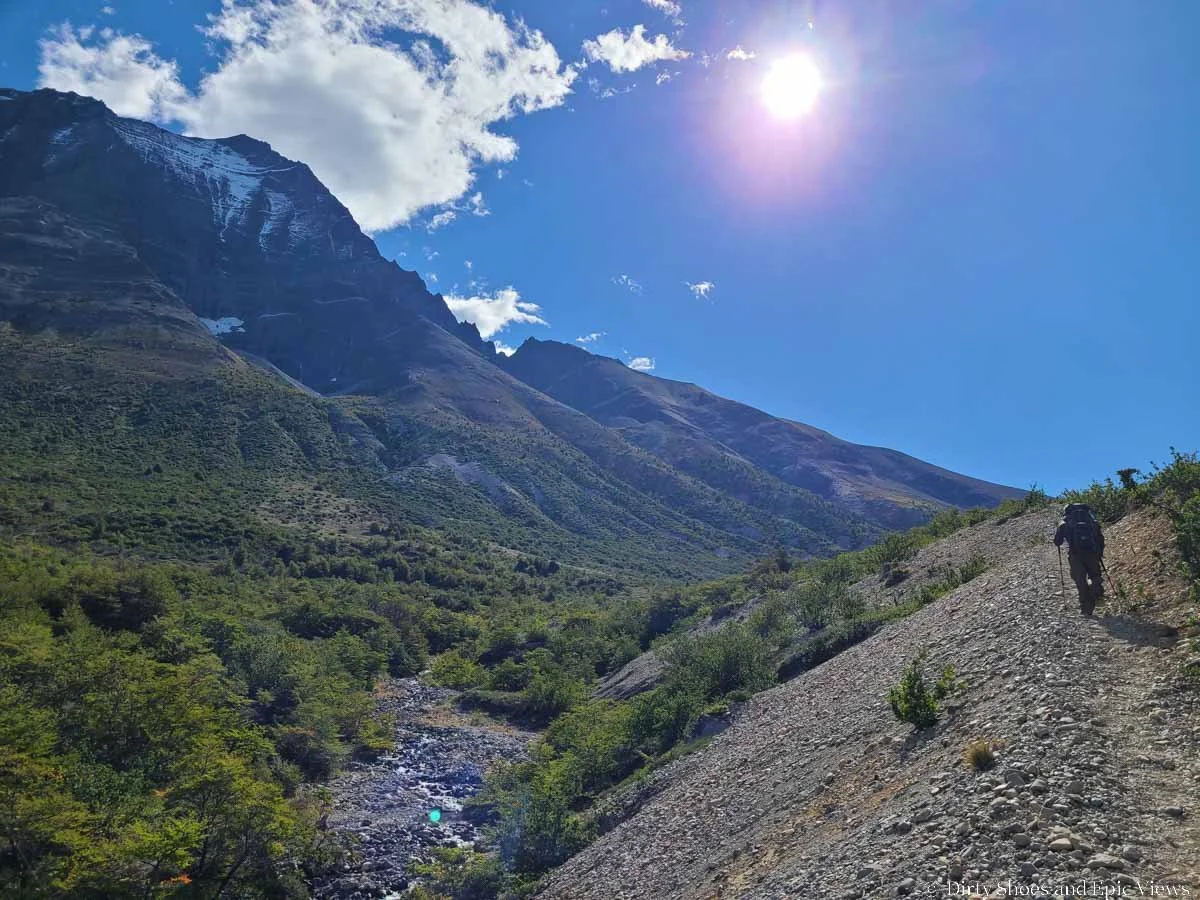
From the junction, the trail climbs steadily and gradually through a meadow is it works its way towards the entrance of the valley. The views continued over the lake below.
At one point, an adorable little owl landed in a tree branch right above our heads to greet us and motivate us to keep going!

A tiny owl landed right above our heads!

Climbing higher and higher to Ascencio Valley
After a bit of hiking, you’ll reach the second junction as the trail turns inward into Ascencio Valley. One path heads back down to the Torres Central region (this is the way you’ll be hiking out tomorrow), and the other heads deeper into the valley towards the base of the Torres- this is the one you’ll follow today.

Turning into the entrance of Ascencio Valley
From here, a narrow trail winds across the rocky slopes above the valley up to Windy Pass. And boy, did this pass live up to its name!
It didn’t last too long, but the area on and right around the top of the pass was insanely windy! Those Patagonia winds strike again.
It was very hard to walk against the headwind here, and the path through here was sandy and full of gravel that was whipping up in our face (again, super helpful to have some sort of bandanna or buff to cover your face through windy passages like this!). When we got to camp, we later found out that the gusts today were up to 69 km/hr!

Windy Pass in Ascencio Valley
Once we were over the pass, the wind thankfully calmed down and we started the long gradual descent down to Chileno Campground in the valley. It was a busy section of trail, as all the day hikers to the Torres were making their way back out.

Descending down the other side of Windy Pass

Hiking to Chileno campground on the O Circuit
Chileno sits right at the base of the descent, tucked into a wooded area by a stream. We got here just before 5:30 pm after what seemed like a very long day on the trail.
The tent sites are on wooden platforms that stretch up a hillside and it’s kind of a steep and treacherous path to get up to the higher sites. We were assigned a site here and ended up with one at the very top of the hill, and my legs hated the climb down and up to the tent each time!

Chileno campground
Along the stream by the campsite is a viewpoint where you can just barely see the tips of the Torres peeking out from the mountains in the valley. We were getting excited for tomorrow to finally get to see these famous peaks and complete the O Circuit!

The Torres del Paine peek out over the foothills!
O Circuit Day 8: Chileno to Torres del Paine
Distance: 13.4 km / 8.34 miles
Elevation gain: 643 km / 2108 ft
Elevation loss: 1099 m / 3065 ft
Time: 6 hours
Day 8 O Circuit Map

The green highlight shows Day 8 of the O Circuit
Day 8 O Circuit Elevation Profile

The shaded portion shows the elevation for Day 8 of the O Circuit
Day 8 O Circuit Trail Description
Today is the big day- the grand finale of the O Circuit! The day you finally get to see the iconic Torres del Paine after 7 days of challenging hiking!
When staying at Chileno, most people try to take advantage of the proximity of the campground to the towers and start early to see sunrise at the Torres, which is spectacular to see as the rising sun lights up the towers in an orange glow.
But for us, the day started out not so great. It was an overcast day with rain in the forecast all morning, so we weren’t concerned about getting a sunrise view, but we did still want to beat any of the day hikers up to the towers. So we headed out of camp by about 6:15 am and started off in the dark.
The first part of the trail to the Torres del Paine lookout from camp wasn’t too bad. You’ll cross the steam near camp on a few foot bridges, and then start off on a fairly smooth path that gradually climbs through the forest with just a few steep sections, and we hiked through it pretty quickly. It was also really quiet through here- I think the weather had scared most people off, at least for the morning.
This part of the trail on the way up was all by headlamp for us, so we’ll show you pictures of the trail from our hike down in better lighting!.

Some small stream crossings at the start of the Torres del Paine hike

The early part of the hike to the base of the towers is a steady climb through the forest

Enjoy this easy part through the forest before the exposed rocky part begins!

The forest occasionally opens up to some mountain views as you climb
After less than an hour of hiking through the forest, we came to the Torres ranger station. Here there are signs noting the trail closure times (you can’t hike past this point after 2 pm, and they advise starting the hike back down from the Torres by 3 pm).

Trail signs at the Torres ranger station along the hike

Looking back down the trail to Ranger Station and where the trail closes at 2 pm
Around here, it started to drizzle on us and we donned our rain gear. We knew rain was in the forecast and the towers probably wouldn’t be out when we got to the top, but we were hoping that it would pass soon and things would clear up, so on we went.
From the ranger station, the trail quickly gets steep, rugged, and rocky. The forest was now thinner at this point, and we were climbing small rocks and boulders in and out of the trees and shrubs. It was getting lighter out and views were starting to open up around us, but the overcast and rain was shrouding out most of the mountain views, including those of the Torres, which would now be starting to peek out with clear weather.

This is what the trail looked like once we past the Ranger Station

Looking back down the trail as the views start opening up

Eventually the tips of the Torres del Paine will start to appear!
After about 25 or 30 minutes of climbing, we left the tree line fully behind and were now on the completely exposed rocky moraine beneath the base of the Torres. From here, it’s about another half hour of climbing through steep and rocky terrain.
The trail starts off as a visible herd path from the tree line, but it eventually just melds into a maze of rocks and boulders. You can use a combination of poles, rock blazes, and small trail signs to guide you through the rocky maze and stay on track.

A light herd path navigates through the rocky terrain beneath the Torres del Paine

A look back down the trail into the valley below

Be sure to follow the orange poles and blazes through the rocky maze on the way up to the Torres del Paine

Mountain views across the valley
As you hike higher, the views of the valley below really open up. But what’s even more exciting is that you’ll start to see the tops of the Torres peeking out more and more over the top of the moraine, and that view will certainly keep you motivated to continue the steep climb through the rock field!

You know you’re close when the Torres start to appear!
The climb will continue and eventually you’ll crest a point where the full view of the Torres del Paine and its beautiful blue lake will come into view, and the rewards for your tough climb and nearly 8 days of hiking will all seem worth it!
Well, if you’re lucky… For us, we were rewarded with a foggy view and no towers! Talk about frustration! I mean, we knew this was going to be our view when we started the hike that morning, but we still couldn’t help but feel a tad bit frustrated that this was our view after 8 days on the O Circuit. What luck!

The towers were hiding when we first got there- a total bummer!
The good news was that we did have all day. We booked a late bus out of Torres del Paine for that day (specifically for this reason- just in case we needed more time here!). We had made it to the Torres by 8:30 am (so it took just over 2 hours with a slower pace), so we had plenty of time.
The problem was, though, if the forecast from last night and this morning was actually right, we’d need to wait several hours for the rain to stop, and who knew whether or not the clouds would actually lift and clear even then. So, that’s what we did. We were adamant on seeing those dang towers, and we’d be so mad if we hiked down too early only for the towers to come out later in the day, so we waited…and waited…and waited…
We found a nice little shelter under a large boulder that shielded us pretty nicely from the rain, but I was still pretty miserable. I was wet, and I was freezing cold (luckily it actually wasn’t windy at all). And there was no one else around. We just kept staring at the mountains, willing the clouds to clear, but nothing ever changed. Not in the slightest.

Trying to stay dry and wait out the rain!
Eventually, I got up to walk around the area to try and warm up a bit, and that’s when I ran into a fellow W Trekker that we had ran into previously on the trail! So we chatted for a bit, and eventually another O Trekker found us- he had also been hiding under a rock nook all morning waiting for the weather to clear.
So there were four of us now- the only ones up here! And I was so thankful we ran into them- I don’t think I would have lasted if we hadn’t. We chatted and distracted ourselves from the cold and rain, and time started to go by a little bit faster.
And before we knew it (well, a full three hours after we arrived at the top), the towers started to appear!
They were still shrouded in light clouds and overcast, but they were starting to show themselves, and we were all getting excited, frantically running around to take pictures and unsure if this would be our best glimpse at them before clouds reappeared.
However, slowly but surely, the towers got clearer and clearer until finally, they were fully out! We couldn’t believe it: our patience had paid off.

The Torres del Paine finally appeared!

So happy to see the famous towers!
And the craziest part of the whole thing was that we were still the only four people up here. Here we were, in a place that is usually crawling with people, enjoying this epic view all to ourselves. That alone made the wait so worth it.
We excitedly bopped around the boulders and rocks around the lake taking pictures of eachother and enjoying the view from every angle.

Thank you to our newfound friends who kept us company and made the hours- long wait so much better!
Finally, at around 1 pm, other people started showing up. We were wondering where everyone was! We learned from the first hikers up that the trail had actually closed at the Torres ranger station except to guided groups due to weather and “dangerous conditions”. So it made us super thankful we had decided to get an early start despite the weather and get up here before they closed the trail.
As clouds continued to roll in and out around the mountains and the towers, we decided to start heading down at around 1:30. This time around, we were able to enjoy the views into the valley as the weather had cleared up a bit and we weren’t getting rained on.
We navigated the steep boulder field back down from the lake, and about halfway down to the tree line is when we rain into literal trains of people all making their way up. It was like they released the flood gates once the rain stopped (or perhaps this was just all the guided groups finally making it to this point), but it was one continuous train almost until the ranger station.

Starting the hike down from the base of the towers back to Chileno

The line of hikers making their way up to the Torres del Paine
When we reached the ranger station just before the forest, there was in fact now a rope crossing the trail with a big trail closure sign (as it was now after 2 pm when this section of trail closes).
From the junction, the hike back to camp finished through a lush green forest on a much smoother and easier path, and we made it back to Chileno by 3 pm- so a bit quicker than the climb up.
We ate lunch here and rested up a bit before starting the hike all the way back down to the Central sector to finally finish the O Circuit.
From Chileno, we first had to make the long and somewhat steep climb back up to Windy Pass to start, which was just one last annoying climb to endure before the long downhill out. In stark contrast to yesterday, there was actually zero wind up at the pass today, despite the worse weather! Just a few minutes after the pass, we reached the junction where you can either go down to Central, or hike around the front of the massif back to Frances.

Climbing back up to Windy Pass from Chileno

At this trail junction, head left following signs to the Central Sector
From this junction, it was all downhill back to Central- just one long steady and continuous descent. It’s a fairly gradual descent down a mix of dirt and rock on a relatively wide path. You’ll have views the whole way out over the lakes and rolling hills on the front side of the massif.

The final (and long) descent of the O Circuit!

At the bottom, the trail flattens out a bit as it navigates the small rolling hills at the base of the massif on the way back to the Central Sector. From the base of the descent, it’s about a 20 to 30 minute walk to get to Las Torres Hotel and to the camping area, and I will admit it was little bit tortuous- we just wanted to get there already!


The final push back to Central at the end of the O Circuit

The end is in sight! The Las Torres Hotel marks the end of the O Circuit and from there it’s a quick flat walk back to the Welcome Center to grab the bus.
We stopped at the campground to cook up some dinner and rest for a couple of hours before our shuttle back to the Laguna Amarga entrance, where we caught the bus back to Puerto Natales at 7:30 pm (again, be sure to check out our O Circuit Planning Guide to get all the details about transportation and accommodations for the O Trek!).
But, we finished the O Circuit! And let me tell you, the feeling of accomplishment after completing 8 days on the trail is second to none. We hope that, no matter if you decide to take on the O or the W Trek, you get to experience all the amazing highlights of Torres del Paine and get to feel that same sense of accomplishment at the end of your trek.
More Patagonia Guides
Are you looking for more information to help you plan your Torres del Paine hike, or to help you plan a larger Patagonia itinerary? Be sure to check out all our Patagonia guides!
We hope this O Circuit trail guide helped give you a better idea of what to expect on both the O Circuit and W Trek in Torres del Paine. Let us know if you have any questions about hiking in Torres del Paine in the comments below, we are always happy to help!